I appreciate each of you so much for trusting this cause and learning yet another tool in the hopes of better communication. By committing to this, we can streamline our communication leaving us less frustrated as we search for some schedule from two weeks ago. This also is a chance for us to actually share about teaching ideas, apps and create a collegial space to grow together. So, thank you. I am so excited!
Download the App….Everywhere
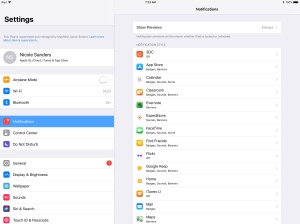
If you haven’t already, download the app on your phone, iPad and computer. This will take away the problem of remembering to check your slack inbox. The will alert you via a notification (which you can silence and customize via settings >notifications >Slack) to let you know someone has posted.
To silence a particular channel or set your Do Not Disturb to a time frame that works for you, click on Settings within Slack. I have our workspace set to not disturb between 6pm and 7am. However, you can change that default for your personal needs.
Follow channels!
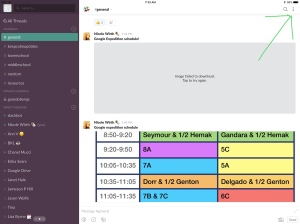
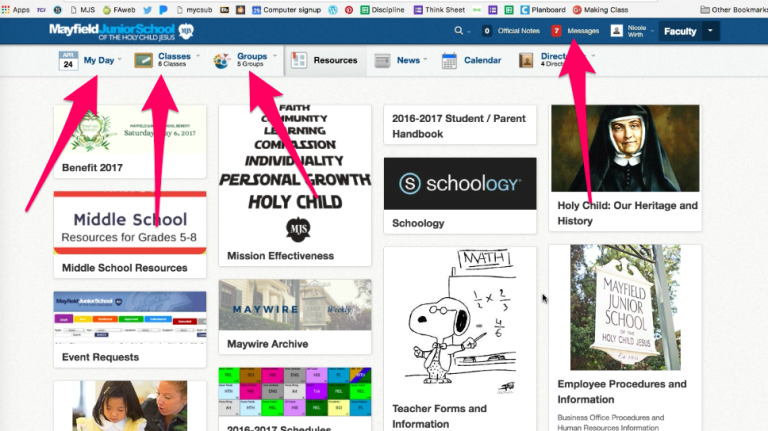
I have set up some channels that I think will be most used by us. The best part is, you don’t have to join any channel that doesn’t apply to you. Click on channels on the tool bar on the left. If you are on the computer, actually click on the word “channels.” If you are on an iOS device, click on the plus sign. Choose each channel one-at-a-time that you would like to join. Make sure to click “Join Channel” on the bottom of the page for each channel. Feel free to add a channel that you think might be valuable. If you would like to set up a private channel with just your team, choose “private channel” and add one!
Use the Directory to Direct Message People
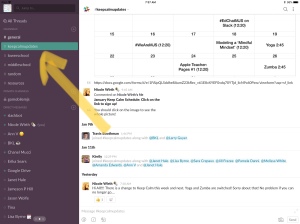
Click on the three dots on the top right corner. Then click directory. Here you will see everyone who is on the workspace. You can direct message them and even look at files shared between just the two or you.
Utilize Search and Stars
Within each individual chat, channel or workspace you can search for files and messages. This is an unbelievably easy way to access old schedules or documents shared. In addition, if you like a message or want to quickly access important documents you can star them. In the same menu, you can click on starred messages and re-access them with ease. How amazing is that?! See what I mean about it being like Schoology but even better?
There is more to learn. If you don’t want to wait until I post again, see me and I would be happy to share tidbits with you! Next step topics could include: how to post a gif, integrate Google Drive, tag people, posting to multiple channels, etc.
I am probably not the only one whose school iPad was, until recently, collecting dust on the bottom of my office shelf. I believed that my computer was a better tool to complete my tasks. Even as a history teacher, laptops tended to be my tool of choice for student work. This belief in the superiority of the computer changed after I met with our school’s Apple rep.
He was not surprised that a lot of the teachers don’t use their iPad during instruction. He attributes it, not to iOS’ limitations, but to our discomfort with the unknown. Finding the buttons on our favorite apps on the iPad takes some learning and it is often easy to just rely on what we know. He explained that by design, computers inherently limit successful tech integration because of their lack of mobility. Computers are portable devices and require a lap or desk to be used. This means the user must revisit a fixed location to utilize it during instruction. The iPad, on the other hand, is a mobile device that enables the teacher to move and engage with students while still connected to the necessary instructional tools. And, he argues, the iPads are more robust than we give them credit for. Apple Classroom and the large amount of creativity apps have only gotten cooler with the iOS11 update. I wasn’t convinced yet, but I was willing to give it a try.
Beginning the very next day, I took the pledge to rely on my iPad as much as possible. Most of you know me as the one you see running around the school going from meeting to meeting with my pink MacBook Air. This change was really hard for me at first. During the first few days, every time I began a project on my iPad I would normally do on the computer, I felt this confusion. The simplest task, like writing an email, was difficult. What do I click? How do I add a picture? A link? Fix a mistake? I borrowed a keyboard, which helped with the typing but it still took time and patience to feel as comfortable on this tool. I am now going on week 6 in this challenge and there is no going back. I am convinced that the iPad offers better tools for teachers than a computer. This blog post will focus on two of the benefits: productivity and mobility.
Be More Productive
With iOS 11, you can actually have dual apps on a screen at the same time. I love this for many reasons. For one, I can organize my screens based on productivity. In one screen, I have my calendar app next to the mail app. In another, I have Evernote, my note-taking app next to my to-do list app, Google Keep. On the other hand, I like that this dual view is only limited to two apps at a time. It actually helps me concentrate and be more productive on the task I am working on. If I need to see my other screens, I just double click the home screen. When using the dual screen, you can easily drag images and text from a website or photos into your document. Watch this 40-second video I made below to see how seamless it is to use two apps at the same time to add things to a class newsletter on Pages.
Many of us choose Word or Google Docs for our word-processing needs. Because the students have iPads, we should be modeling use Apple-based products. Often, Apple products work better and more efficiently on the iPad and with iOS 11, you can save documents in the Cloud and collaborate with others the same way Google Drive allows you to. For instance, the Numbers app is very simple and has a lot of features that make it so much more than just a spreadsheet app. It is also more user friendly than Excel. It would be a great tool for teaching the research and writing process. Each sheet can be a different step in the process: one sheet for obtaining sources. One for organizing research, another for the outline, etc. Teachers can design the template and share it through Apple Classroom or choose the “Collaborate with Others” option to have the whole class work on the same document. One thing that is always tricky about Google is sharing a document you created and having students have their own version. This usually takes extra steps by you or the students to make this work. With the sharing options on Apple products, we can share copies to each other seamlessly. Word is not even available for students so we should not be posting assignments as Word documents. Students are forced to convert before they even open it.
Be Mobile
Any document or PDF on your iPad can be shared with your students via Classroom. Imagine instead of posting the worksheet on OnCampus, you just opened the document and sent it to everyone’s iPad? It would certainly save some login time and allow you to adjust your lesson on the fly. And, with Apple Classroom on your iPad, you can see what everyone is doing in the room while you walk around and work one-on-one with students.
Use the iPad as your white board! Use a drawing app like Paper 53, Notes, Evernote or Notability and a stylus to solve math problem or model outlining for a couple examples. Project it on your Apple TV or use the app, Reflector, and suddenly everyone has a ‘smart board.’ iOS 11 actually allows you to screencast and record what you are doing on your iPad with or without sound. Imagine just pressing record as you teach a lesson and then sharing the video through Apple Classroom with the homework. What if you did that for a year and collected your lessons? The following year, you could use the flipped classroom model and support them as they do their homework in class, having got the lesson at home via YouTube. #mindblown
Your iPad has a way longer battery life than your computer. For someone like me who was consistently carrying a charging cord with an almost dead computer, I feel really free having just my iPad. And, iOS apps use way less battery than third party apps. Think about running Google Maps on your phone- kills your battery right? Well, Maps does not!
Mobility in Practice
I have been challenging myself to have students use the iPads as much as possible in real-world ways. “Real World” refers to ways people would use technology as a tool to be more productive, to communicate and to collaborate. For instance, in my 7th grade Idea Lab class, students used whatever app they wanted to brainstorm for the design thinking project. The only requirement was that it had to be an app that allowed you to draw and write/type. I gave them each a stylus, which they loved. It was interesting to see which app students chose. A lot of them chose Notes, and by the end, they had all switched to Paper 53. They had to get all of their brainstorms onto one iPad for the presentation, so they air dropped them to one student who connected to AirPlay to present.
After this assignment I realized that the kids are not as comfortable with iPads as we assume they are. I asked the kids: how many of you know how to use the dual screen and use it to drag pictures from one app to another? They all attempted to convince me that they knew: “Oh yeah, I do that all the time…..” But when I asked them to use the dual screen, many didn’t know how or claimed it wouldn’t work. Upon further investigation, it was clear many hadn’t even upgraded to iOS 11. In addition, giving kids stylus’ was like giving them a brand new iPad all over again. They were mesmerized by them. Some even used it to type letters. This was not the most efficient way. 🙂 Finally, when the first group presented, I had to remind them to connect through AirPlay. They tried to just hold up their iPad.
I want to get my students to a point where the tools on the iPad are not foreign or novel but just part of every day use, so they are better equipped to decide which app or tool works best for them. In order to accomplish this, we must constantly be modeling best practices ourselves.
Take the Challenge: #GoMobile
Have I convinced you yet? If so, I challenge you to join me in this movement and close your computer for an hour, a day, a week, a month or whatever time frame you choose and rely solely on your iPad.
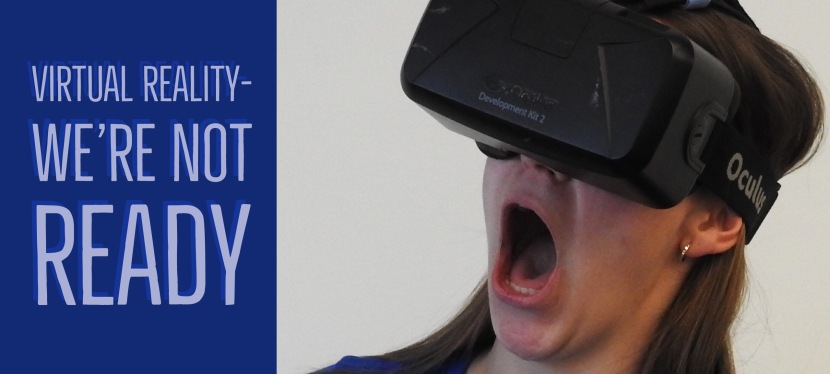
The EdTech Teacher Summit 2017 created a more realistic picture of where the world is going in technology and how quickly education must change to keep up. From virtual and augmented reality to wearables that measure emotion, modern technology brings exciting and moral implications to our world. These tools open major opportunities for bringing learning to life but they also pose serious threats to our understanding of truth and intellectual property.
The Answer for Teaching Empathy
Current research is quickly discovering that the immersion of people in a virtual world is an unbelievable tool to teach empathy. Imagine giving a middle schooler a headset that brings them to a Syrian refugee camp. They can see and hear things as if they were there. As they turn, so does the camera: up, down and side-to-side. Now imagine that while they are wearing the headset, they also are wearing a suit that hits more senses like feel, or smell to make the experience more realistic. You actually don’t have to imagine because these tools are already available.
Moral Implications
But with this great tool comes a lot of ethical questions. Imagine how scary or haunting an experience like this could be for someone because of how real it feels. The research has shown that people who have VR experiences actually remember the moments as if they were really there. And, the memories trigger from the emotional response. Think about the biases of the creators and how this might impact reality. Should textbook companies be creating these? News companies? Religious institutions?
Why should we care? In the age of ‘fake news’ our obligation to teach students to critically analyze the bias and intent of a media source is about to get a lot harder. Think about it. If consumers of VR actually remember experiences as if they were actually there, VR creators have the power to shape memories and therefore perceived truth.
Next Steps for Teachers
What should we do about it? Well, waiting for VR headsets to be as ubiquitous as iPhones to address this issue is definitely not the responsible response. We did that with social media and look where it has gotten us. Instead, expose your students to VR and while doing so, have open discussions about the pros and cons. Give them opportunities to critically examine these technologies by asking the right questions and taking the novelty away early. This could have an important impact on its growth and regulation in the future.
Let Students Consume VR
VR can be consumed or produced. The easiest way to immerse the students in your subject area and experience VR in a meaningful way is through the Google Expeditions app. The virtual tours allow students to travel around the world, outer space and even inside the human body. You guide the tour by giving them directions for where to turn. When they hit certain places, you can read information provided or guide them with your own information. This is basically PowerPoint on steroids. They can use iPads or they can use Google Cardboard headsets with their phones. Best of all, it’s free!
Give Opportunities to Produce VR
There are a ton of amazing ways you or your kids can produce VR. You don’t even need to take a 360 degree photo. Use one that already exists to create VR tours of famous places and museums. Open source 360 degree photos are available on 360cities.net and Flickr. In Flickr, you can search ‘The Commons’ for open source pictures and then ‘equirectangular’ to get a curation of 360 degree photos that are available for personal use. For 360 videos, go to YouTube and type “360 degrees” in the search.
Take 360 degree photos yourself! With the Google Streetview app, you can take them anywhere, and it’s free! This app does not seem to exist on the iPad. There are other apps that do a better job for a low cost.
After you have the picture, you can create a virtual reality tour for others to experience being in ‘your’ shoes. There are rumors that Google Expeditions will soon be allowing others to create their own Expeditions. This could be amazing for teachers especially if there is a library of non-Google created content for others to use. This will be an awesome way to make projects for a real purpose.
Google Tourbuilder, Roundme and Story Spheres are all programs that allow you to build your own tours although all are limited in what you can add. while one allows audio, the others only allow added texts. Tourbuilder is not available through an iPad. I encourage you to look through these as there are amazing examples on each of the websites.
CoSpace Edu seems by far the most expansive. You can add your own picture, one you downloaded from the above sources or you can choose from their library. Some environments are fictional and cartoon-like. You can add 3D models created on Tinkercad to your virtual world and you can access Google Poly library for open source 3D .stl files. Finally, there is a coding component you can add using block coding like Scratch to make the 3D objects move. It is fantastic and second graders can use it.
Ideas for Producing VR in your class:
Create a VR scene to a poetry reading
Create a scene in history or from a story
Take 360 photos in students’ favorite spaces on field trips. Kids can bring them back and curate a virtual fieldtrip
Find pictures of rooms in museums around the world and students can create their own virtual field trip.
Lead Discussions with Your Students
Discussion questions that can be adapted for all ages:
What is cool about VR?
How did it feel to be in another person’s shoes? How did it change your perception of that person or place?
If you could immerse yourself in another environment which would you choose? Where would you go? What environment would you not choose?
How could we use VR to help people?
How could we use VR to scare people?
Think about the creators of the VR environments. Do you think there is potential for bias? How could this become a problem?How could we solve that problem?
What rules should be in place to protect people?
Is it actually a benefit to empathize with people we disagree with? How so?
What about VR games? How cool would Minecraft be as VR!? How would it change the way you play the game? Is it possible to make a VR game too realistic? How could a violent video game like Grand Theft Auto or Call of Duty be too realistic in VR. If so, how can we protect people?
I encourage all of you to follow @gregkuloweic and @arvrinedu to stay up on this technology and how it is impacting education.
Stay tuned for part 2 of this series: Wearable Technology Taps into our Emotions
Most of us, staff included, have led a workshop or class where participants walk around and add Post-its with thoughts to a large piece of paper. Each piece of paper usually has a different topic or question written at the top. Afterwards, ideas written on the post-its are shared by the instructor or via gallery walk by the participants. The extent of use usually ends there, because, at the end of the workshop, you must decide what to do with those large pieces of paper. You don’t want to throw them out because you may want to reference them later. But, they are large and awkward to store and the Post-its usually lose their stickiness and get all mixed up shortly after.
With Post-It Plus, not only do these problems disappear, but, there are also so many more cool things you can do with these same posters later on. Let me explain. Post-It Plus takes a picture of your large papers and scans each Post-It note separately. Therefore, your external poster has now becomes a digital platform to interact with the post-its as if they were still paper. You can reorganize them, categorize them and even combine Post-its across topics. Therefore, an entire room of people can be using the same sheet of post-its on their iPads or iPhones and be reorganizing and grouping based on their own perspectives.
See It In Action
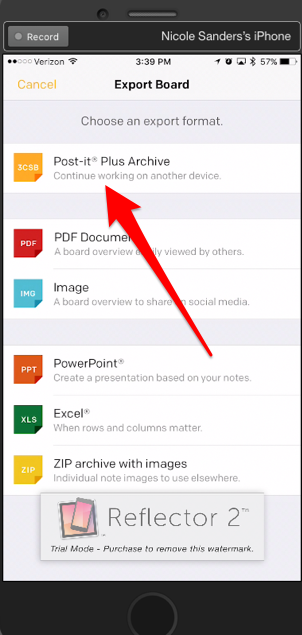
Here are some screenshots from the Post-it Website that shows some of the cool things you can do with it.
Not only can you name your boards and subcategories, you can then reorganize the Post-its based on these changes. You can add new notes with many colors to choose from and you can draw or type. You can also pull notes from other boards and add them to new boards. Finally, you can save it as a .pdf or as an image to save for later or turn in!
Here is a screencast of me playing with the app. I don’t have a poster of Post-its to take a picture of so I did the demo version where it pretended to upload a picture.
Ideas for Use
I have a ton of ideas for taking the old lessons we have all done and taking them a step further with the app:
Make words or sentences using mixed up Post-its. Mix them up on the board. The students scan the board and go back and sort at their desks.
Write equations and number sentences. Students could make a number sentence, mix it up and then trade iPads and solve each other’s problems.
Annotate a book with post-its. On each post it, put the page number and the quote, thought or question. Students can leave them inside the book and at the end they can curate their thoughts by scanning the post-its and categorizing them. Keep the notes for future writing assignments and to study for tests!
Trace the routes of a famous explorer, traveler/ human migration patterns. Students can use Post its to mark their path and then scan the post-its to see the shape.
Create a timeline using a Post-it for each event. Students organize in order.
Re-sort Post-its based on new categories they come up with or you give them.
Students can add two more Post-its/Take away ones that don’t ‘fit’.
Organize them (example: from least to greatest importance.)
Respond to one post-it in a reflection, speech, or persuasive essay.
Save as .pdf and submit to teacher/presenter to serve as a formative assessment.
Tie it to one of Harvard Project Zero’s thinking routines! See below for ideas for a few of the routines. Click on the link to be directed to the Project Zero website and see the routine explained in full.
What Makes You Say That? -students could choose one or two post-its on the sheet to question. Students find the author of the two Post-its and asks “What Makes You Say That?” This will further the conversation and get students to think deeper about their ideas and opinions.
Circle of Viewpoints -after writing down various viewpoints of a topic on different post-its, students can scan them, sort the viewpoints into categories and create questions they have for the various perspectives. This would be amazing for a pre-persuasive essay activity or speech/debate prep.
I Used To Think….,But Now I Think -This could be done as a culminating activity. Pull out the KWL post-it chart from the beginning of the unit; students can scan it (or scan it at the beginning of the unit and save for later) and analyze how their thinking has changed. Likewise, it could be about hot-button current event discussion. They could start with their preconceived opinions and after research and a structured class discussion like socratic seminar, students can revisit their early opinions and reflect.
Compass Points -This would be great as an introduction to a self-driven project, Genius Hour, or even as an introduction to the class service-learning project. Students could make their own virtual poster filled with Post-its containing ideas for projects. They can organize their ideas into categories. Then, do the Compass Points thinking routine to narrow down ideas.
The Nuts and Bolts
Travis has added this to Self Service for the 7th, 8th and faculty iPads. He has sent the app to Library, the Hayden cart, and 3rd and 4th grade class iPads. So they should be there when you need them! #thankstravis
It is recommended that you use a dark colored marker or felt-tipped pen when writing on the Post-its so they are most likely to show up when scanned.
This app works best with regularly-sized square Post-its.
Make sure the Post-its are not overlapping and are about 1/8inch apart from each other. This will make scanning much more seamless.
You can take numerous pictures of the same board if the board is too big. After you have captured one “board” you can hit the plus sign to add another photo to the same board.
Unfortunately it doesn’t let you collaborate with others within the app. But, you can export it to another device. What I mean is, you can send it via email and open it on someone else’s Post-it app for further organizing. When you export it, just save it this way. (see below) So, this way numerous people can edit the same file as long as it is one-at-a-time.
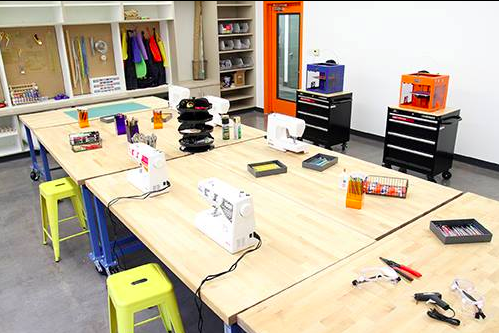
We are ready to start our second year with our amazing D-Lab! Many of us already have ideas about how to integrate making, creating and design-thinking into their curriculum this year. Just in case you need some inspiration, here is a collection of of some cool ideas I found on Pinterest and other sites. If any of these piques your interest let me know and I will get you more information and start planning with you. Many of these projects can be altered to fit any curriculum!
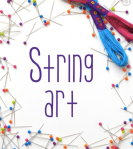
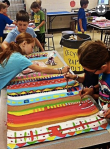
Students show their thinking through string art. They can even use nails and wood to make it!
A collaborative Native American painted ‘weave.’
Creative business cards! #internprogram
Michelangelo painted on his back. What if kids had to paint with their toes or from far away?
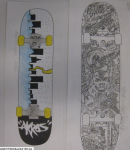
Design a skateboard and laser cut it!
Design a skateboard for a famous figure…
Make your own relief stamps. This would be amazing for studying the cityscapes of cities.
Finished product! You could even have students draw scenes in stories for this project. #literacyconnection
Make stamps: good for patterns, abstract art…
Stamp making a different way: Could they make their own printing press this way?
Making art with vegetables? This is definitely channeling second grade service learning
Printmaking with Islamic patterns….channeling 7th grade history! There is also a ton of ways to do printmaking with kids!
Make a monster machine using science!
Chemical energy for the win!
DIY Pinball machine: makey makey portion not necessary but fun!
cardboard arcade 2.0
Using art, makey makey and coding to teach art history
makey makey makes music
Use play-dough to learn about plate tectonics….6th grade science!!
Make robots to teach surface area of different shapes-middle school math!
Connecting literature to making! I have a whole book on literature connections to making. See me if you are interested in more ideas.
These exist on tpt for so many books!
Bloxels uses pixels that students design to make video games. We have these….and they are so cool.
All the tools for students to make a landing pad to land on mars!
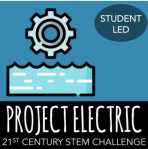
Harness wave energy!
Defend your home from a hurricane, STEM challenge!
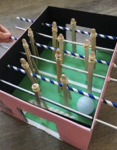
Teach soccer by designing your own foosball table!
Below is a curation of interesting articles for us to ponder or dive deeper in over the summer! I will continue to add to this, so please send me any you would like to add to this list!
While free seating seems to have a lot of potential to grow voice and choice and help our more fidgety students stay focused, at times assigned seating is necessary to improve social interactions and formal instruction. This teacher found a way to have both!
Makey Makey is for all ages! Use this fun tool to practice programming and math skills. (See Adrienne to use them) They also talk about using sewing to teach pixels and curves along a grid. A lot of good concrete ideas here.
Peter DeWitt, Ed.D., has done his research on education leadership and summarizes some of the reasons teachers might not be as open to coaching as other professions. Where do you fit in?
For those of you who read the last article and are thinking, “I would love some coaching,” here is a blog post from a teacher who is joining the #observeme movement. Hope Teague-Bowing, the author of this post explains, “Math teacher, Robert Kaplinsky, is challenging educators to rethink the way we pursue feedback by making it easy and immediately obtainable.” #observeme is something you probably will see next year at MJS, so it is worth a closer look!
As a history teacher, I find that one amazing way to get kids excited about almost any topic is through maps. And, there are maps about EVERYTHING! From the most popular baby names in each state to world hunger statistics around the world, there is a map for your class. This two websites shows how the Mercator Projection used for navigating has warped our understanding of how big countries and continents are in relation to others. A greater potential for empathy can start with understanding our place in the world!
So this is a genius way of holding kids accountable. The article explains how students are required to send formal emails to their parents explaining why they didn’t do their work. This would work so great with 7th and 8th graders with the iPads. They must CC you!
This article delves into specific strategies for teaching fractions and what the brain needs to actually learn them. From visualizing strategies to conceptual understanding, researchers have discovered that fractions can only be learned through multiple approaches utilizing multiple senses.
Typing skills are important. People can type at a much faster rate than they can write; therefore, it would appear that typing is the better option for taking notes. Researchers argue differently.
So three different people shared this link with me. Something tells me people know I like school supplies. Katie was the first to show me how to do this so see her for tips! But, this is an awesome way to make short rubrics to stick on rough drafts and to make cute personalized notes for kids.
This is a blog post that poses an interesting thought: “If our students are successfully cheating in how they go about finding correct answers, perhaps the real problem is that we are asking them the wrong questions.”
This is a curation of novels specifically focused on creating empathy on social justice issues that are current and relevant to people in our country. They focus on lack of equity among adolescents of different upbringings, gender, culture and sexual-orientation.
This blog, “Cult of Pedagogy,” is by far the best education blog out there, from my perspective. I highly recommend following it on Facebook, Twitter or directly through email. Jennifer Gonzalez was a middle school English teacher who is now a full-time blogger. In this article, she talks about how teachers feel this need to be perfect the first time at all attempts to try something new. She argues, if we look at every attempt to try something new as the “beta test” we will be more apt to try new things and be ok when it doesn’t work out perfectly the first time.
A school librarian designed a ‘March Madness’ menu of choice for students during writer’s workshop or when they finish early. There are some great ideas in here to keep students on task while giving them voice and choice!
Yes, we know, skills are becoming increasingly more important than content knowledge for our future students. They need to be creative problem solvers who can converse and work with others. BUT, they also need to write. Computer coders and innovators who can’t write are less marketable than ones that can! Nobody will ever be able to duplicate what they have created if they can’t write an instruction manual that is readable for a broad audience. This article talks about how to blend these skills of problem solving with the ability to write.
As Islamophobia is on a rise, it is important that we give students an opportunity to see Muslims as humans and as heroes that many are. Here is a compilation of children’s stories that attempt to do just that!
Is the ultimate end the right answer? Or, is it an ability to explain why it is the right answer? Watch this video from MindShift that argues the latter.
Hopefully everyone is aware that we will leave Schoology behind next year and begin using a new Learning Management System (LMS), OnCampus. For those of you who would like to experiment with OnCampus and make your transition more seamless, here is a short screencast video I made for getting acquainted with the program. I am a beginner as well, so this is purely an introduction. Sara Torres, Bridget, and Adrienne will teach us through upcoming meetings and workshops to deepen our understanding. It will be part of our summer homework to become comfortable with the new system.
This video will
help you find OnCampus.
show you the most important aspects of the website.
examine some differences between OnCampus and Schoology.
*********It is important to note: we will no longer be able to access our resources and materials on Schoology after June. Therefore, transferring your material onto OnCampus or into another program is necessary! More information for how to best do this will come!
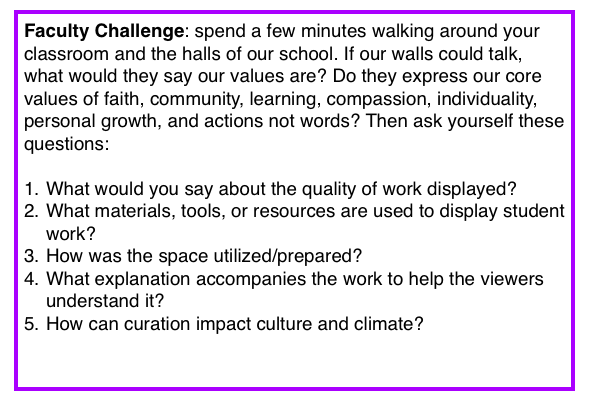
We do so many great things at our school. Nobody will ever work a day at Mayfield and say they are bored. Our inspiration from the kids, autonomy from our administrators and our annual traditions keep us regularly on our toes and continuing to grow our teaching practices. I don’t know about you, but I left my MEC meeting feeling reminded of how joyful I feel to be a part of this special community of educators. Having said this, I would like to spend a minute talking about something that our school could work on: what and how we display on the walls.
Last week I attended the Deeper Learning Conference at High Tech High in San Diego. I wish I could truly put into words what it feels like to walk in the doors of the High Tech High schools. You can tell immediately that they value deeper learning, process, reflection, and community. You know just from looking at the walls and ceilings that they give their students opportunities to do and create amazing things.
At Deeper Learning, I had the opportunity to attend a Deep Dive eight-hour session called Curating Student Work. The presenter was the superintendent of a rural public school in Kentucky who is doing some incredible work in this area. I have some key take aways from this experience and hopefully with this post you will see some examples of ways we can express our values more clearly and more professionally.
Before you create an exhibit, make sure it connects to one of our goals
Here’s the thing. There are some student work worth curating and some that are just not. When we take a minute to think and reflect about work we choose to display, we also have the opportunity to reflect on the work we assign.
All displays should follow these three rules:
symmetry repetition surprising
Here is an example of this and a cool project idea from HTH: Each document is framed and students made laser cut sunglasses for final reflections! My favorite part is it is writing about empathy in math class!
This slideshow requires JavaScript.
Take away the barriers of bulletin boards
The fadeless paper that inevitably fades mixed with the cheesy bulletin board borders limit us to space and size. It also sends the clear message to the kids that they are not making real or authentic work, but “kid work.” And, no, this space should not be to hang cheesy posters.
There are simple ways to make this happen. Using curtain rods, clips and wire, clip boards, driftwood backgrounds, shelving you can make all student work, even work in progress, look professional and improve the standard of what you expect from the kids. These structures will also make hanging work simple and reusable and allow for more displays on the wall!
Here are some examples from HTH:
This slideshow requires JavaScript.
Use the laser cutter or other creative materials to make titles
It looks so much more like a professional exhibit when you take the time (with the help of Adrienne! 🙂 And guess what! You can reuse them! Here are some examples from HTH:
This slideshow requires JavaScript.
Make a placard to explain the project and process
A simple framed piece of paper that explains the project, grade level and a bit of the process it took to create allows the community to have a better understanding of the work that went into the creations. Here are some examples from HTH:
This slideshow requires JavaScript.
Get help!
This is a huge undertaking. These schools have had help from the art teacher who is partly hired to design these exhibits. Some have even hired part time curators. We are definitely not there….yet. 🙂 But know that there are people to help you. This is a perfect assignment for that artistic parent volunteer. There are also incredibly creative artists who are here to give you ideas. Penny and Peggy have been inspirational for me and have great ideas to share. Sara C., our resident weaver, is beyond creative and is so amazing at thinking outside of the box. Adrienne can help with the laser cutter and has quite the design aesthetic as an experienced graphic designer. While I cannot say that I am artistically inclined, I am beyond willing to get my hands dirty to help you along the way.
You may disagree with me, but I do think this is worth saying: You are wasting your time in the classroom and your personal time grading at home by assigning writing without explicitly teaching the writing process. And by process I do not simply mean a graphic organizer.
This, officially called by education researchers, “Writing Process Approach,” is defined as teaching each step of planning, organizing, drafting, revising, and reflecting. It not only has statistically proven to improve writing but it has also proven to relieve the inevitable anxiety. A study in 2014 concluded that since most of the anxiety stems from being graded, students were less fearful of the grade because the focus was spent on the process and not the final product. And, the students’ final product have less mistakes, so students grades tend to be higher. (Bayat, p.1139)
For me, I find that the process approach yields stronger writing. My high expectations each year are consistently met because of the incremental steps I take with my students.
Here is a compilation of research-based strategies mixed with strategies I have picked up over the years from various colleagues and conferences for teaching formal writing. They might not all work for you, but if you are interested in adopting a process-approach, there are hopefully a couple nuggets for you.
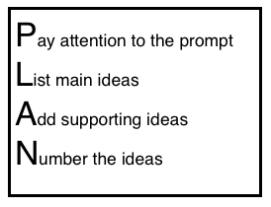
Planning
This would be the step following or coinciding with the preliminary research where students gather information and textual evidence to use when they write. A study done in 2002 had kids memorize and use pneumonic devices, like PLAN, so that they could do this on their own. According to this research, students who were taught how to use and to memorize these pneumonic devices wrote “essays that were longer, contained more mature vocabulary and were qualitatively better.” (De La Paz and Graham 2002, p. 687) I find this alone to be a bit elementary. I talk about how to expand this a little later.
Organizing
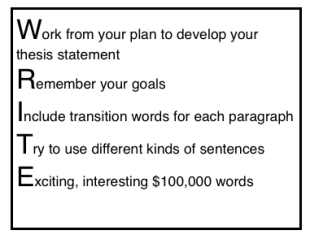
Here is the next pneumonic device in the conclusive study that the process approach works:
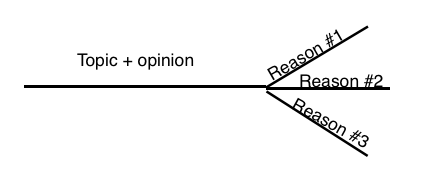
Writing a thesis statement can be intimidating for students. I use the DBQ Project’s chicken foot method for the standard five paragraph essay, but the most important part of the puzzle is that first part: topic + opinion (without saying, “I think,” or “I believe.”)
How valuable would it be for kids to realize that thesis statements should really be in all forms of writing (well, except for creative writing). History, response to literature, science, and even math writing can utilize the common vocabulary. For more complex thesis statements, for 8th graders, Jill requires them to add a phrase in the beginning acknowledging that the statement about to be said can be refuted. Phrases start with “although” or “while.”
When organizing complex essays that expand to numerous topics and body paragraphs, students can break down their main ideas from the PLAN and WRITE phase to body paragraph topics. Each body paragraph topic could be listed on a separate page. And students can organize and number their supporting ideas based on the paragraph topic. This really helps in the preliminary research as well.
During this phase, a graphic organizer can be useful. Read Write Think has a good one! Essay Map
Drafting
While many believe students should have the freedom to choose where in the introduction to place their thesis statements, the best way to teach it is as the last sentence of the introduction. This is because it is the most logical for students to understand when first learning to write in this way, students need to understand the rules before they can break them and this is what is expected of them in high school. (Did you see how I modeled a complex thesis statement there? ) 🙂
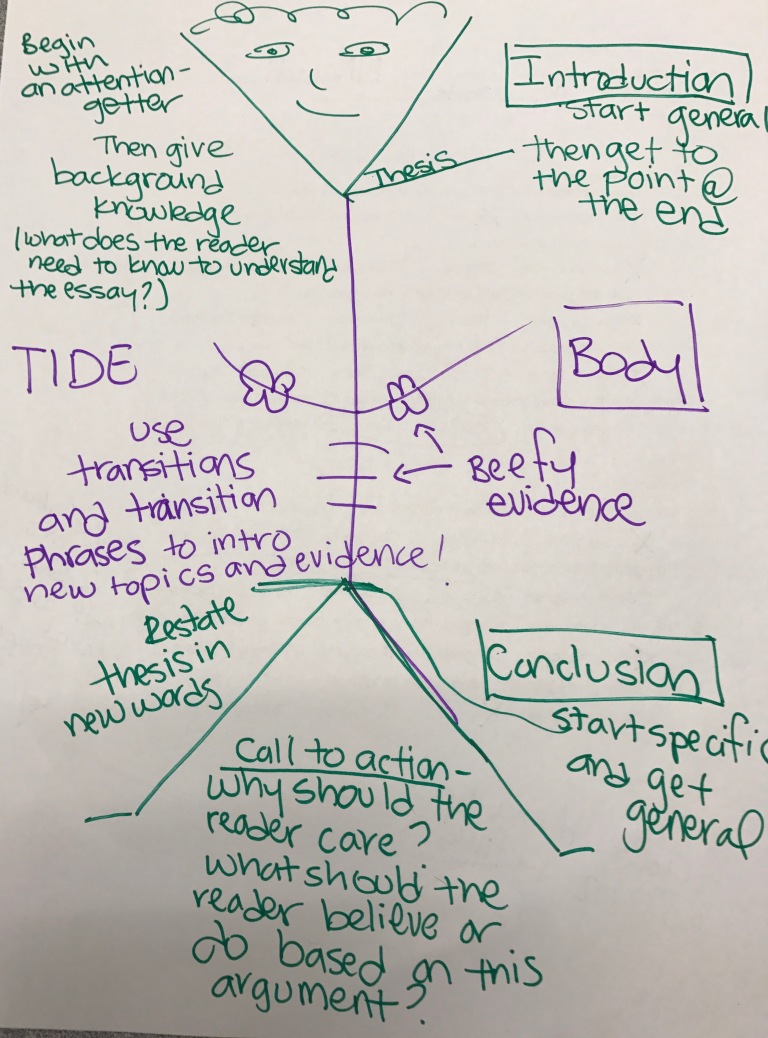
So, obviously this is what I teach to my students. Below is a diagram that I learned from Jill many years ago that helps give students the general outline of writing a research paper or a persuasive essay. She coined him Essay Man: the ultimate writing teacher’s boyfriend…..and for you male teachers out there, Essay Woman works great too. 😉
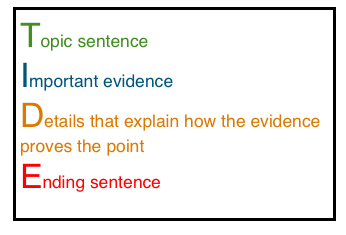
TIDE is a pneumonic device that breaks down the body paragraphs or paragraphs that stand alone. Students color code as they write. It is important to specify how many pieces of important evidence they need. For every piece of evidence, they need a detail. Ann has a ton of resources for TIDE, so see her for help!
Revising:
There are many ways to skin the cat on this one: self-assessment, peer evaluation, conferencing one-on-one with students, etc. But, it should always include you, the teacher, giving them feedback at some point in the process. We have all given students copious notes for improvement after giving a grade. But, they never read them. All they care about is the grade. And, we can’t fault them for that because the grade is all that matters. (see grading blog post)
The absolute best time for feedback is during this phase of writing. I make it a rule to never sit down when they are writing. There should be regular coaching. My biggest struggle is helping the kids that don’t advocate for themselves and ask for help. So, I brought in the big guns. Kimmy and Ann are amazing assets and I encourage you to reach out to them and invite them into your classroom to help kids revise their writing. Having another teacher in the room who is an expert in helping struggling kids, especially with reading and writing, is pretty much life-changing. The amount of time your name is called goes down exponentially!
Self-assessment has also been proven to successfully improve writing. According to Kristen Nielsen (2012) in her article, “Self Assessment Methods in Writing Instruction: A Conceptual Framework, Successful Practices and Essential Strategies,” “Self-assessment in writing signifies any teaching method that prompts writers to think about, evaluate and/or respond to their own writing.” (p. 1) Nielson compiled list of include: “Teach students the criteria for rating their own work,…use writing models to demonstrate specific writing skills and to give students opportunity to practice assessment,…[and] students should participate in the development of the marking criteria.” (Nielson 2012, p.10-11)
For my last essay, I gave students a simple check list for them to go through as they read the paper. One part asked them to color code their typed document: blue for the thesis statement, red for transition statements, green for quotes. This helped me grade too, because I could quickly see whether they can identify these vocabulary words and if they know what to do with them!
Peer evaluation can be valuable when done correctly. Often, kids are paired up in mixed-ability groups. Which is so useful for the struggling student. But what about the high kid? Where is he or she getting feedback from? You also have to be very clear about the criteria they are looking for. They are not looking for grammar or punctuation mistakes, or, heaven help us, penmanship critique. They are looking at the specific writing goals (i.e. checklist) and see if there is room for coaching. It is also important that you teach them how to give feedback. Good sentence starters are “I like” for strengths and “I wonder” for improvements.
Here is a video of a silent critique activity I have done with my students that works really well. I learned this from the Deeper Learning Conference at High Tech High. (Forgive me: I did this for grad school and it is very raw!)
Reflection:
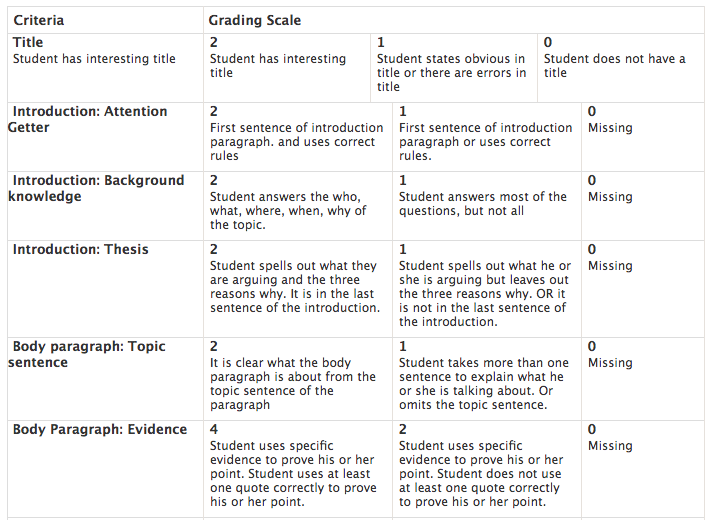
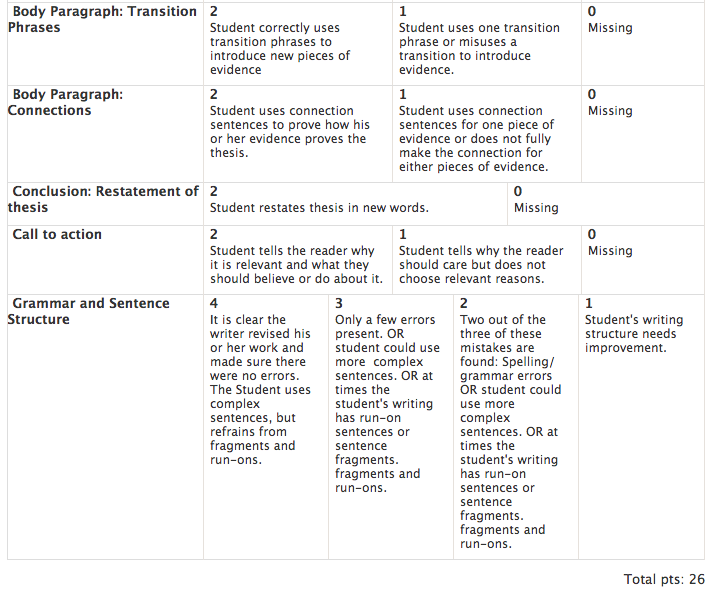
For almost every assignment I use rubrics. Not only does this tell the student why he or she lost points, but it also makes it easy for me to provide comments at the end of the semester. I can clearly see strengths and weaknesses. But, how many kids really look at the rubrics? For my persuasive essay I just did with the 6th graders, I was pretty confident none of them did. What is the point of grading, if not to teach them how they can improve? I told all of my students that they could improve their score if they met with me during office hours and resubmitted their writing based on my recommendations. Here was the rubric I used:
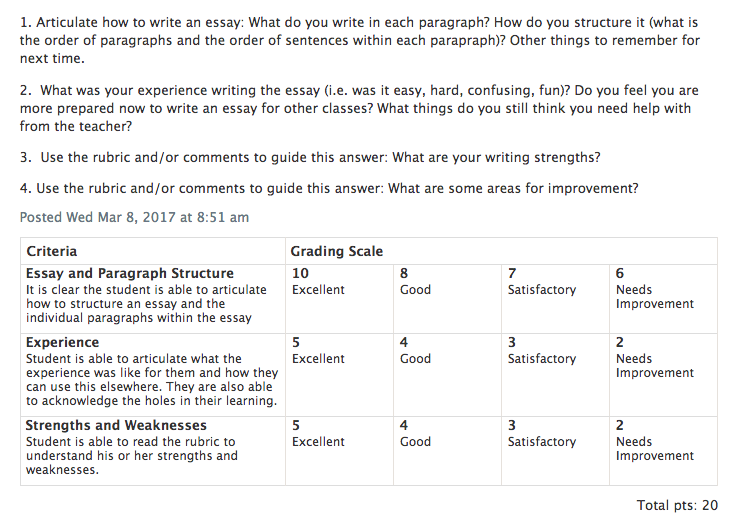
I had all of them do a reflection which forced them to look at the rubric and I made it worth almost the same amount of points as the essay itself. Here are the questions I asked.
I know what you are thinking: wow, it is a lot of work to teach writing! And, that is a completely fair assessment! 🙂 I plan to follow this up with more ideas learned from other teachers. Please let me know strategies that have worked for you so I can share them!
Resources:
2. BAYAT, N. (2014). The Effect of the Process Writing Approach on Writing Success and Anxiety. Educational Sciences: Theory &Practice, 14(3), 1133-1141. doi:10.12738/estp.2014.3.1
De La Paz, S., & Graham, S. (2002). Explicitly Teaching Strategies, Skills, and Knowledge: Writing Instruction in Middle School Classrooms. Journal Of Educational Psychology, 94(4), 687.
Nielsen, K. (2014). Self-assessment methods in writing instruction: a conceptualframework, successful practices and essential strategies. Journal Of Research InReading, 37(1), 1-16. doi:10.1111/j.1467-9817.2012.01533.x


 Organizing